
Last Updated: November 4, 2026
Quick Summary
Preventing water damage from old pipes means watching for warning signs like rusty water, drips, and pressure drops, then acting before a burst. Insulate exposed pipes, replace aging supply lines, install smart leak detectors, and test your main shut-off valve twice a year. If corrosion runs through the whole system, plan for replacement rather than repair.
- Galvanized steel is the shortest-lived pipe option, often failing well before the rest of the house.
- Wrap pipe fittings as well as pipes, since fittings freeze first in cold spaces.
- Replace any supply hose that feels soft or shows rust at the fitting.
- Test your water main shut-off valve twice a year so it works in an emergency.
- Test the sump pump before storm season by pouring water into the pit.
Table of Contents
- Why Old Pipes Fail and How to Spot the Warning Signs of Corroded Pipes
- Step 1: Insulate Exposed Pipes and Winterize Exterior Plumbing
- Step 2: Replace Old Supply Lines Before They Burst
- Step 3: Install Smart Water Leak Detectors Throughout the Home
- Step 4: Manage Your Water Main Shut-Off Valve and Regulate Pressure
- Step 5: Clean Gutters, Test the Sump Pump, and Control Humidity
- What the Cost of Whole House Repiping Actually Covers
- DIY vs. Professional Plumbing Inspection: What Each One Catches
- Frequently Asked Questions
Why Old Pipes Fail and How to Spot the Warning Signs of Corroded Pipes
Preventing water damage from old pipes starts with knowing what fails first. Most pipe failures are slow, predictable, and visible months before they burst. Corrosion and mineral buildup thin the pipe wall until a small crack turns into a flooded crawlspace. Regular inspections help identify these vulnerabilities early, providing the necessary oversight to prevent water leaks before they compromise the structural integrity of your home.
The warning signs usually show up long before the disaster:
- Rust-colored water when you first turn on a tap
- Faucet drip that never fully stops
- Water pressure that has quietly dropped
- Discolored stains on ceilings or under sinks
Material Lifespans: How Long Copper, PEX, and Galvanized Steel Last
Galvanized steel is the oldest and shortest-lived option, often failing well before the rest of the house. Copper piping lasts decades but corrodes faster in aggressive water. PEX resists corrosion and mineral buildup. If your home still runs galvanized steel, plan for replacement rather than repair.
Seven Red Flags You Should Never Ignore
Watch for these, in order of urgency:
- Brown or rusty water at any tap
- Visible corrosion or green crust on joints
- Unexplained spikes in your water bill
- Damp patches on walls, floors, or ceilings
- A water pressure gauge reading that keeps climbing
- Pipes that rattle, thump, or sweat
- Any pipe older than its expected lifespan
The EPA guidance on household water use and leaks notes that even small leaks waste significant water over time, which is why early detection pays off.
Step 1: Insulate Exposed Pipes and Winterize Exterior Plumbing
Insulation is the cheapest freeze protection you can buy. Wrap exposed pipes in unheated spaces, then shut off and drain exterior hose bibbs before the first cold snap.
Focus on these areas:
- Crawlspace and basement runs
- Garage walls and attic lines
- Outdoor spigots and irrigation lines
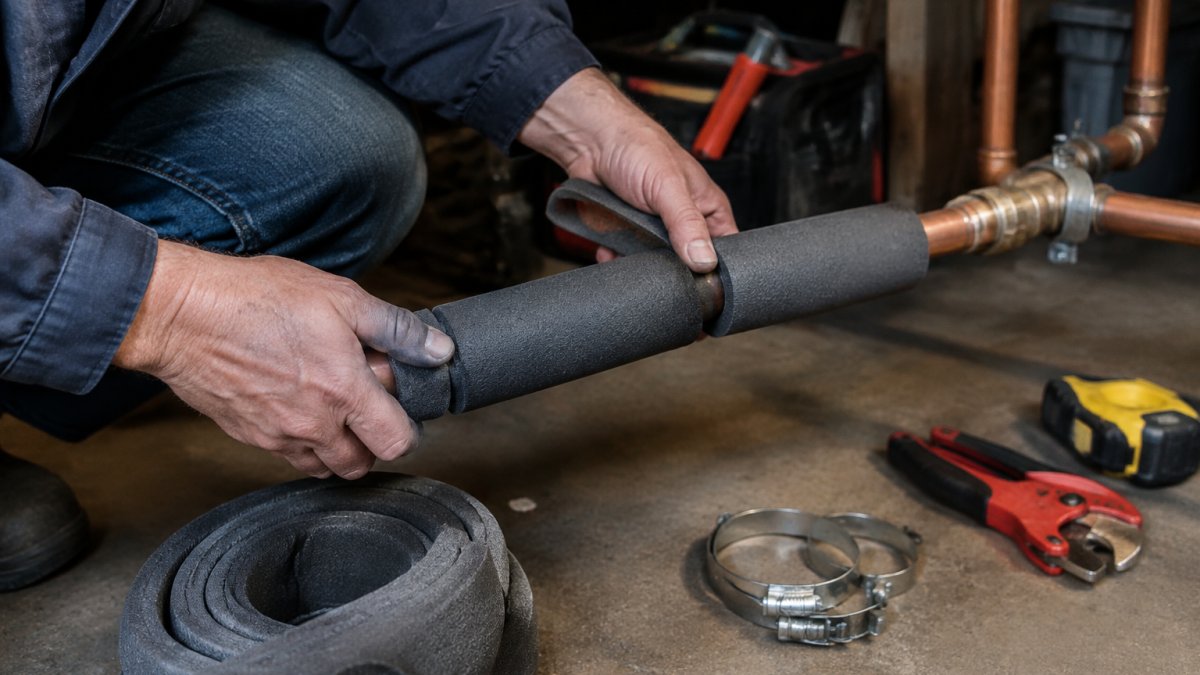
A common mistake is insulating only the pipe and leaving the fitting bare. Fittings freeze first. Wrap them too, and keep the thermostat at a steady temperature rather than letting the house drop overnight.
Step 2: Replace Old Supply Lines Before They Burst
Supply lines are where most catastrophic failures begin. If your home still has original shut-off valves and hoses, swap them now rather than after a flood.
Watch out: a swollen or bulging supply hose can burst without warning. Replace any hose that feels soft or shows rust at the fitting.
When corrosion runs through the whole system, repair stops being the cheaper option. If you are weighing a fix against a full replacement, see repiping the home and our guide to why a repipe may be the right call. And if a pipe bursts before you get ahead of it, call an emergency plumber for burst pipes and leaks.
Step 3: Install Smart Water Leak Detectors Throughout the Home
- Under every sink, inside the cabinet and on the cabinet floor
- Behind and beside the washing machine, plus the supply box
- In the water heater pan and at the base of the heater
- At the sump pit and along the basement or crawlspace floor
- Under the dishwasher and refrigerator ice-maker line
- Near the main shut-off valve and water softener
Pair detectors with basic prevention. Our team covers leak detection and prevention techniques, including the common leak areas worth monitoring in every home.
Call Now For A Free Estimate ?
Step 4: Manage Your Water Main Shut-Off Valve and Regulate Pressure
Know where your water main shut-off valve is, and test it twice a year. A valve that will not close is useless in an emergency.
High water pressure speeds up wear on every joint and supply line. Ask for a pressure check during any plumbing inspection. If pressure runs high, a regulator protects the whole system and reduces the risk of a pipe burst.
Step 5: Clean Gutters, Test the Sump Pump, and Control Humidity
Water damage does not always come from inside the pipes. Clean gutters and downspouts carry roof water away from the foundation. A clogged downspout sends it straight into the basement.
Test the sump pump before storm season by pouring water into the pit and watching it kick on. Keep indoor humidity in check with ventilation and a dehumidifier in damp spaces (the EPA). Moisture detection plus good drainage is your best defense against basement flooding.
What the Cost of Whole House Repiping Actually Covers
The cost of whole house repiping depends on home size, pipe material, and how much wall access the job needs. Pricing also varies with the number of fixtures and whether the work is a partial or full replacement.
A repipe quote should cover:
- New supply lines in PEX or copper
- Removal of old galvanized steel or failing copper
- New shut-off valves and fittings
- Patching and cleanup
- A workmanship guarantee
We give transparent estimates before work begins. For current pricing, request a quote from our team.
DIY vs. Professional Plumbing Inspection: What Each One Catches
A DIY check catches the obvious: visible drips, rust, and damp spots.
| Check | DIY | Professional |
|---|---|---|
| Visible leaks and drips | Yes | Yes |
| Water pressure test | No | Yes |
| Hidden corrosion and pipe wall condition | No | Yes |
| Slab leak and moisture detection | No | Yes |
| Shut-off valve and regulator check | Partial | Yes |
A proper water damage inspection evaluates problem areas before they become a disaster. That is the difference between a small repair and a flooded home.
Frequently Asked Questions
Will homeowners insurance cover water damage caused by corroded pipes?
Most standard homeowners policies cover the resulting water damage from a sudden pipe failure but exclude the cost of repairing the pipe itself, since corrosion counts as a maintenance issue. Gradual seepage or long-term leakage is usually denied outright. Document the damage immediately, photograph everything before cleanup, and read your policy’s exclusions before calling the adjuster. Replacing old pipes proactively is often the only way to avoid a denied claim entirely.
What are the early warning signs of failing pipes in a home?
Watch for discolored water with a brown or yellow tint, metallic taste, faucet drips that return after tightening, visible green or white crust on copper fittings, rust stains in sinks or tubs, and a sudden drop in water pressure at multiple fixtures. Unexplained spikes in your water bill and damp patches on walls or ceilings also point to hidden leaks. Any two of these together warrant a professional inspection.
Can smart water leak detectors really prevent water damage from old pipes?
They do not stop a pipe from failing, but they catch leaks within minutes instead of days. For homes with aging galvanized steel or copper piping, that early warning is the difference between a small cleanup and a full basement flood.
How often should residential plumbing be inspected to prevent leaks?
An annual inspection suits most homes, but properties with pipes older than 25 years or a history of leaks benefit from a check every six months. Seasonal residents should schedule one inspection before leaving for the season and another on return, since slow leaks behind walls go unnoticed in an empty house.
Old pipes do not fail on a schedule you can predict, but they do give warnings. Protek Plumbing and Drain Specialists has spent over 35 years helping homeowners act on those warnings before they turn into water damage. We offer 24-hour emergency service, transparent estimates before work begins, and a 100% workmanship guarantee. Get started with Protek Plumbing and Drain Specialists and protect your home before the next pipe fails.
